
Instruction Manual


8 Running the VAPR Procedure
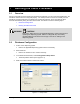
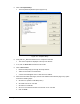
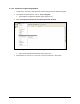
Figure 2-7 Fluidmove – Vacuum Assisted Prime Window
NOTES The "Prime for" time and the "Fluid Pressure" time settings are influenced
by fluid viscosity and nozzle size. The values of 15 and 5 seconds are
default values.
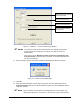
Click the box next to "With above setups, prime valve automatically next
time (Auto Prime)" to skip this step in the future. A checkmark appears in the
box when it is selected.
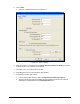
10. When the priming process is complete, Fluidmove will display the following message.
Figure 2-8 Fluidmove Priming Messages
11. Click OK.
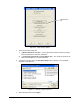
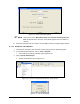
12. When the Prime Verification window (Figure 2-9) opens, enter the desired time into the
Dispense Duration field, enter the desired detection weight, and click on Verify to start the
verification process.
NOTE Prime verification is most effective when dispensing for a short duration and
detecting a small amount. The values of 1 second and 1 mg are default values.
Sets change in the Z-height
for priming location.
Time to create vacuum.
Time to hold needle open.
Delay time before starting
fluid pressure.