DispenseJet® Series Vacuum Assisted Priming Routine Operations Manual
Notice This is a Nordson ASYMTEK publication which is protected by copyright. Original copyright date 2010. No part of this document may be photocopied, reproduced, or translated to another language without the prior written consent of Nordson ASYMTEK. The information contained in this publication is subject to change without notice.
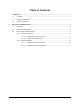
Table of Contents 1 2 Introduction ......................................................................................................................................... 1 1.1 Overview .................................................................................................................................. 1 1.2 System Requirements .............................................................................................................. 1 1.3 Theory of Operation .......................
1 Introduction 1.1 Overview This manual describes the software setup and sequence for operating the Vacuum Assisted Priming Routine (VAPR). VAPR is designed for use with the DJ-9000 Series DispenseJet and is available on the M-2000 and S-900 Series Dispensing System platforms. Refer to the DJ-9000 Owner's Manual (P/N 7200530) for detailed instruction on valve operation. 1.
2 Running the VAPR Procedure 2.1 Overview Priming commands are executed through the Fluidmove software. Prior to running the VAPR routine, the Fluidmove software must be configured properly. The VAPR procedure can be run manually from the Fluidmove Production Window or the Fluidmove Programming Window, but is most effective when launched automatically during the valve offset routine. This section covers the following topics: • Fluidmove Configuration • Running the VAPR Procedure WARNING! 2.
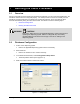
5. Click on Edit. The Valve 1 Settings window opens (Figure 2-2). Figure 2-2 Valve 1 Settings 6. Make sure there is a checkmark next to Change Default Fluid Pressure Setting in the Fluid Pressure section. If not, click the box to select it. 7. Click OK to return to the Setup Valves window. 8. Click OK again to return to the Fluidmove Main Window. 9. Verify/select the valve offset routine. a. In the Fluidmove Main Window, click on Configuration>Setup Scripts Options. b.
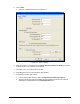
Selected Script File Figure 2-3 Setup Scripts Options c. There are two VAPR script files. 1) “_Machine Offsets DJ Line.pss” – This script performs machine offsets including a vacuum assisted prime and prime verification. 2) “_DJ 9K Priming (VA Prime on Purge Station).pss” - This script only performs the vacuum assisted priming, no prime verification. d. To select a script file, click on the Prompted Setup button to display a list of available script files. See Figure 2-4.
2.3 Running the VAPR Procedure The VAPR procedure can be run automatically as part of the valve offsets routine or manually from the Fluidmove Programming Window or Fluidmove Production Window. NOTE 2.3.1 VAPR must be run on a clean valve with a new feed tube. Once fluid has been introduced into the valve VAPR cannot be used. Automatic Operation NOTE Make sure that "_Machine Offsets DJ Line.pss" is the selected script file. Refer to Step 9 under 2.2 Fluidmove Configuration. 2.3.1.
5. Click on Prompted Setup. The Prompted Setup Window opens (Figure 2-6). Figure 2-6 Prompted Setup 6. Verify that the "_Machine Offsets DJ Line" script file is selected. The current script file is displayed at the top of the window. 7. If not, click on Select File and select it from the list. 8. Click on Run to End. 9. Fluidmove will prompt you through the setup task list. Tasks are executed in the order listed. A check mark will appear next to a task when it is finished.
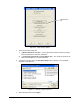
Sets change in the Z-height for priming location. Time to create vacuum. Time to hold needle open. Delay time before starting fluid pressure. Figure 2-7 Fluidmove – Vacuum Assisted Prime Window NOTES The "Prime for" time and the "Fluid Pressure" time settings are influenced by fluid viscosity and nozzle size. The values of 15 and 5 seconds are default values. Click the box next to "With above setups, prime valve automatically next time (Auto Prime)" to skip this step in the future.
13. Figure 2-9 Prime Verification Window NOTE Click the box next to "With above setups, do verification automatically next time" to skip this step in the future. A checkmark appears in the box when it is selected. When the remaining tasks are complete, click on Exit to close the Prompted Setup Window. 2.3.1.2 Fluidmove Teach Window 1. Install a clean valve with a new feed tube and fluid syringe onto the dispensing system. 2. In the Fluidmove Main Window, click on Teach a Program. 3.
4. Click on Prompted Setup. 5. Verify that the "_Machine Offsets DJ Line" script file is selected. 6. 7. 2.3.2 The Prompted Setup Window opens (Figure 2-6). The current script file is displayed at the top of the window. If not, click on Select File and select it from the list. Click on Run to End. Fluidmove will prompt you through the setup task list. Tasks are executed in the order listed. A check mark will appear next to a task when it is finished.
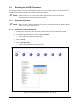
2.3.2.2 Fluidmove Programming Window 1. Install a clean valve with a new feed tube and fluid syringe onto the dispensing system. 2. In the Fluidmove Main Window, click on Teach a Program. 3. The Fluidmove Programming Window opens (Figure 2-13). Click on Setup>Prime>DJ Series Fluid Priming Vacuum Assisted. Figure 2-13 Fluidmove Programming Window - Setup Menu 4. The Vacuum Assisted Prime Window opens (Figure 2-7). Perform Steps 9-12 under 2.3.1 Automatic Operation previously in this section.
Nordson ASYMTEK Headquarters 2762 Loker Avenue West Carlsbad, CA 92010-6603 USA Tel: (760) 431-1919 P/N 7221171, Revision A © 2010