
User Manual

Maintenance and Service 27
6.6 Removing and Replacing the Needle Assembly
To remove the Needle Assembly:
1. Remove the DJ-9500 from the platform as described in 6.3 Disassembling the DJ-9500 –
Wetted Parts previously in this section.
2. Wipe the fluid residue from the needle assembly.
3. Orient the jet with the needle assembly tip pointed upward.
4. Loosen the stroke adjustment assembly and remove it.
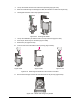
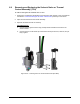
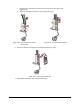
5. Use your fingers to push out the needle assembly. Use the pin on the needle insertion tool
(Figure 6-21) to continue pushing the needle through the lower bearing.
To install the Needle Assembly:
NOTE Needle Insertion Tool (P/N 7208915) can be used to assist with needle
replacement.
1. Apply a light coating of lubricant (P/N 48-0018) to the shaft and seal of the needle
assembly.
WARNING! Failure to lubricate the shaft and seal will lead to rapid wearing of parts and failure.
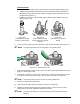
2. Unscrew and separate the needle insertion tool base and pin (Figure 6-21).
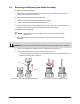
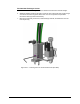
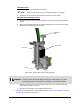
3. Insert the needle flange into the insertion tool base (Figure 6-22).
The needle flange should audibly snap into place when new. The flange should rest just
below flush with the edge of the base.
Figure 6-21 Unscrewing the Needle Assembly
Figure 6-22 Inserting the Needle Flange
Base
Pin