
User Manual

Maintenance and Service 25
Unitized Nozzles
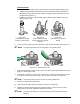
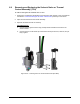
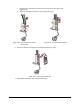
a. Place the Unitized Nozzle into the recessed area of the Fluid Chamber (Figure 6-16).
b. Install the Fluid Chamber/Unitized Nozzle over the needle assembly and against the
base of the jet body. Make sure the chamber is engaged with the alignment pin in the
jet body base (Figure 6-17).
c. Install the TCA over the unitized nozzle with the retainer fingers aligned in the open
position (Figure 6-18).
Figure 6-16
Unitized Nozzle In Fluid
Chamber Cavity Recess
Figure 6-17
Fluid Chamber/Unitized
Nozzle Placed over Needle
Assembly
Figure 6-18
TCA Placed Over Unitized
Nozzle
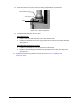
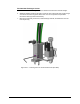
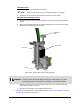
6. Use torque wrench (P/N 7219143) to tighten the collar retainer assembly. See Figure 6-19.
NOTE The retainer will rotate over the TCA flange to the closed position.
Figure 6-19 Tightening the Collar
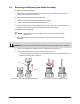
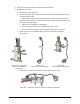
7. Tighten the stroke adjust knob until the cross hole is almost gone inside the sleeve and zero
aligns on a mark (Figure 6-20).
8. If zero does not align on a mark, use the 1/32 hex key to loosen the setscrew and reset the
zero position of the stroke indicator ring to any one of the four marks on the jet body.
NOTE This step should only have to be done once during initial setup.
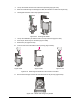
9. Pull down on the Stroke Indicator Ring.
10. Tighten the stroke adjust knob until it bottoms out (do not over tighten)
11. Release the Stroke Indicator Ring and it will lock into place. If it does not lock in place,
slightly back off the stroke adjustment assembly until it does.
NOTE The version with detents on every hash mark (P/N 7212318) will need to be
pulled up.