
User Manual

Maintenance and Service 19
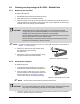
6.4 Cleaning and Inspecting the DJ-9500 – Wetted Parts
6.4.1 Removing the Cup Seal
To remove the cup seal:
1. Disassemble the DJ-9500 as described previously.
2. Wipe fluid residue from the needle assembly.
3. Inspect the lower end of the jet body and inside the Thermal Control Assembly body and
cooling passages for the presence of fluid. Wipe clear any fluid deposited on these areas
and flush with 1.5 bar (22 psi) of pressurized air.
CAUTION! Fluid detected in the Jet Body (cooling path) or Thermal Control Assembly
(cooling path), must be cleared immediately or serious damage may result. The
damage may include permanent blockage of the cooling path.
DO NOT place the DJ-9500 on its side if fluid is suspected inside the jet body as
this may cause fluid to run into the solenoid valve.
DO NOT immerse or expose the internal components of the solenoid valve or
Thermal Control Assembly to cleaning solvents.
NOTE If fluid is detected in the jet body or the TCA cooling path, a leak has occurred. Refer to
Section 7 - Troubleshooting.
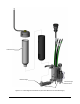
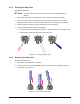
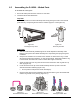
4. Remove the seat from the fluid chamber using
the seal/seat tool (P/N 7201416).
See Figure 6-2.
Figure 6-2 Removing the Seat
5. Remove the O-ring from the fluid chamber using
the blue seal removal tool (P/N 48-8105).
6.4.2 Cleaning the Cup Seal
To clean the cup seal:
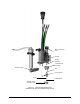
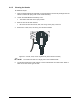
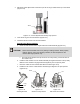
1. Using the seal tool (P/N 7201416), remove the
fluid seal from the fluid chamber. See Figure 6-3.
2. Flush or soak the nozzle, seat, O-ring, cup seal
and fluid chamber in the appropriate solvent until
they are clean. See 6.4.3 Cleaning the Static
Seal for instructions on cleaning the static seal.
Figure 6-3 Removing the Fluid Seal
NOTE Use the solvent recommended by the fluid manufacturer.
CAUTION! Do not use metal objects when cleaning the wetted parts. Damage to these parts
may result. Use soft cleaning tools such as cotton swabs and brushes.
3. Inspect the nozzle, seat, O-ring, fluid seal, heat exchanger (if present), and fluid chamber
for wear or damage. Replace as necessary.