
User Manual

Maintenance and Service 17
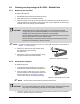
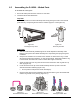
6 Maintenance and Service
6.1 Overview
Performing the recommended maintenance and service procedures increases the life of your
DispenseJet Series DJ-9500 and ensures high quality dispensing performance for every production run.
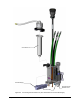
Refer to Figure 6-1 when performing the following maintenance and service procedures.
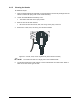
6.2 Safety First
Dispensing system operation involves heat, air pressure, fluid pressure, mechanical and pneumatic
devices, electrical power, and the use of hazardous materials. Refer to the Safety section of your
particular dispensing system manual prior to installing and operating your DJ-9500 Valve.
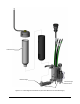
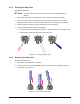
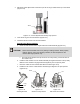
6.3 Disassembling the DJ-9500 – Wetted Parts
To disassemble the DJ-9500 – Wetted Parts:
1. Position the DJ-9500 at the front of the dispensing area.
2. Turn the Thermal Control Assembly (TCA) off and allow it to cool.
3. Turn the Body Heater off and allow it to cool (if applicable).
4. Open the platform hatch and disconnect the electrical and pneumatic lines.
5. Loosen the dovetail receptacle using a 4-mm hex wrench and remove the DJ-9500.
6. Remove the fluid reservoir.
DJ-9500 Version
a. Disconnect the fluid reservoir from the feed tube assembly at the luer fitting and remove
the syringe. Cap and store the fluid reservoir as necessary.
b. Remove the feed tube assembly from the fluid chamber and discard into an approved
receptacle.
DJ-9520 Heat Exchanger Version
a. Pull down on the release lever and remove the Heat Exchanger.
b. Disconnect the fluid reservoir from the Heat Exchanger, and remove the syringe. Cap
and store the fluid reservoir as necessary.
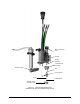
7. Open the stroke adjustment assembly (counterclockwise) until the red part aligns with the
sleeve to release the spring load on the needle assembly.
8. Loosen the Collar/Retainer Assembly ½ turn.
The retainer will rotate to the open position.
9. Slide the Thermal Control Assembly off the fluid chamber.
Be careful to retain the nozzle, seat, and O-ring as they may come free.
10. Remove the fluid chamber with the nozzle by sliding it over the needle assembly.