
Manual


32 Maintenance and Service
NOTE The screws should be tightened to a torque of 1.36 N-m (12 in-lb), except where noted in the
assembly instructions. New o-rings must be treated with an o-ring type lubricant.
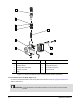
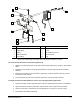
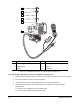
To reassemble the Lower Body (Figure 5-5):
1. Install the elbow connector to the lower body ensuring that the fluid intake port is facing correctly.
2. Install the u-cup seal to the lower body as follows:
a. Make sure the springy side of the u-cup seal is facing out.
b. Using the ring and seal insertion tool, carefully seat the u-cup seal into the lower body.
c. Using the ring and seal insertion tool, carefully seat the o-rings to the u-cup seal into the
lower body.
3. Set aside the assembled lower body.
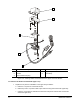
To reassemble the Upper Body (Figure 5-5):
1. Install the u-cup seal to the upper body as follows:
a. Make sure the springy side of the u-cup seal is facing out.
b. Using the ring and seal insertion tool, carefully seat the u-cup seal into the upper body.
2. Using a flat-head screwdriver, install the fitting to the upper body in its correct place.
3. Using a flat-head screwdriver, install the plug to the upper body in its correct place.
4. Install the air hose to the air inlet of the upper body ensuring a secure fit
5. Set aside the assembled upper body.
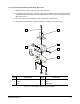
To assemble the Lower Body, Upper Body, and Solenoid Valve (Figure 5-5):
1. Place the lower body and upper body on a flat surface and align the attachment holes.
2. Using the torque wrench, install the two screws through the lower body and the upper body
ensuring a secure attachment.
3. Place the solenoid valve on top of the upper body and align the attachment holes.
4. Using the torque wrench, install the two screws through the solenoid valve and the upper body
ensuring a secure attachment.
5. Set aside the assembled lower body, upper body, and solenoid valve.