
Manual

Maintenance and Service 23
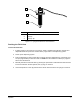
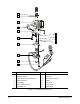
6. Remove the lower body as follows:
a. Use the 7/64-inch hex key to remove the two screws from the lower body.
b. Carefully pull the lower body off of the needle.
c. Remove the exposed small o-ring that holds the u-cup seal in place. Leave the u-cup seal
intact.
d. Set aside the disassembled parts for cleaning.
7. Inspect the exposed needle and u-cup seal to determine need for replacement as follows:
a. Look for uneven roundness of the u-cup seal or signs of wear that prevents a good seal.
Discard or replace the u-cup seal as appropriate.
b. Look for a broken needle tip or signs of wear marks such as polished streaks on the metal
where it meets the u-cup seal.
8. Remove the elbow connector from the lower body by unscrewing it and set it aside for cleaning.
9. Leave the upper body, the solenoid air valve, and related parts in tact.
10. Further inspection and cleaning of the dissembled components and parts may be performed at
this time.