
User guide


Troubleshooting 41
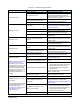
Table 6-1 Troubleshooting (continued)
Symptom Possible Cause Recovery
Dots are too small
Wrong nozzle size Replace with a larger nozzle.
Too few dots per shot
Increase the number of shots per dot by
editing the dot parameters in Fluidmove.
Refer to the section on programming of dots
in the Fluidmove User Guide.
Micro-adjustment setting too low
Increase the needle stroke by rotating the
micro-adjustment counterclockwise.
Syringe pressure too low Adjust the fluid pressure.
Dots are not round
Dirty nozzle
Clean the nozzle with solvent. Refer to
“Cleaning the Nozzle” in the Maintenance
and Service section.
Damaged nozzle Replace the nozzle.
Incorrect temperature
Set the correct temperature. Refer to the
Fluidmove User Guide or Online Help.
Fluid pressure too high
Adjust the fluid pressure gauge to the
correct setting.
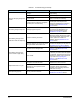
Dots are too flat
Dispenser heater temperature
too high
Reduce temperature in increments of 2°C
(3.6°F). Refer to the Fluidmove User Guide
or Online Help.
Micro-adjustment setting too high
Reduce the needle stroke by rotating the
Micro-Adjustment clockwise.
Dots are too tall
Dispenser heater temperature
too low
Increase temperature in increments of 2°C
(3.6°F). Refer to the Fluidmove User Guide
or Online Help.
Micro-adjustment setting too low
Increase the needle stroke by rotating the
micro-adjustment counterclockwise.
Skipping dots
Air has gotten into the pump,
possibly during disassembly
Prime the DispenseJet. Refer to “Priming the
DispenseJet” in the Operation section.
Solenoid not firing
Follow the steps in “Preparing
the DispenseJet for Fluid
Dispensing” in the Operation
section. If you do not hear a jet
of air bursting out through the
solenoid as you perform that
procedure, or if you do not hear
a clicking sound from the
solenoid, the solenoid may not
be firing.
Loose or disconnected solenoid
cable
Connect solenoid cable to CPC connector
on the dispensing head.
Fluidmove not configured correctly
Verify that Setup Valves
Damaged solenoid or solenoid cable
in Fluidmove is set
to “DJ”.
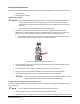
Follow the procedure below:
1. Using a 3/32-inch hex key, remove the
socket cap screws on the solenoid.
2. Remove the solenoid, and replace it
with a new one.
Replace the socket cap screws and use the
hex key to tighten them.
Valve air pneumatic hose or main air
regulator not connected
Check valve air and main air pneumatics;
tighten connections if necessary.
Solenoid is firing, but no dots
are forming
(If you feel a jet of air bursting
out through the Solenoid when
you follow the steps in
“Preparing the DispenseJet for
Fluid Dispensing” in the
Operation section.
Plugged nozzle Clean or replace nozzle.
Failed dispenser component or
clogged jet
Remove any excess fluid that may be
blocking chambers and orifices. See
“Complete Cleaning” in the Maintenance and
Service section.
No adhesive in dispenser, or air
bubble in the flow path
1. Prime the Dispenser. See Priming the
DispenseJet in the Operation section
2. Check the syringe and valve pressure.
Ensure that the valve is properly
connected to the dispenser.
Dispenser not cycling Refer to “Dispenser Does Not Cycle” below.