
User guide


38 Maintenance and Service
3. Using the 0.05-inch hex key, tighten the preload set screws to lock the preload screw in place.
4. Using your fingers, loosen the micro-adjustment locking nut by turning it counterclockwise.
5. Turn the outer micro-adjustment collar clockwise until it stops.
CAUTION! Do not continue to turn the outer micro-adjustment collar once it stops, or you may
damage the DispenseJet.
6. Use a 1.5-mm hex key to loosen the micro-adjustment collar set screw.
7. Raise and turn the outer micro-adjustment collar clockwise so that the vertical zero (
0) marking
aligns with the vertical centerline on the inner micro-adjustment column.
NOTE The bottom of the outer micro-adjustment collar should align with the horizontal zero
(
0) marking on the inner micro-adjustment column.
8. Using the 1.5-mm hex key, tighten the micro-adjustment collar set screw.
9. Rotate the outer micro-adjustment collar counterclockwise to set the micro-adjustment to the
desired parameter.
NOTE Every ten marks on the outer micro-adjustment collar equal 0.10 mm. For example, a
movement of five marks equals 0.05 mm relative to your starting position. Only the
increment marks on the outer micro-adjustment collar are relevant for adjustment.
10. Finger-tighten the micro-adjustment locking nut.
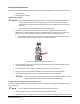
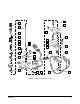
Figure 5-10 A
Figure 5-10 B
Item Description Item Description
1 Micro-Adjustment 6 Micro-Adjustment Collar Set Screw
2 Preload Screw 7 Micro-Adjustment Collar
3 DispenseJet Cap Markings 8 Inner Micro-Adjustment Column
4 Cap 9 Micro-Adjustment Locking Nut
5 Preload Locking Nut 10 Preload Set Screw
Figure 5-10 Micro-Adjustment and Preload Settings
6
55
0
0
20
55
0
0
20
1
2
3
5
4
10
7
9
8