
User guide


Maintenance and Service 37
Settings and Adjustments
There are two adjustment settings that must be performed after disassembly and cleaning of the DJ-2100:
• Preload setting
• Micro-Adjustment setting
To adjust the preload:
NOTES
The preload setting affects the jetting velocity of the fluid and regulates the cleanness of
the fluid break-off, which affects the shape of the dots or lines. The preload setting is
regulated by the number of times the preload screw is turned downward from its point of
reference.
This procedure requires the DispenseJet to be disassembled.
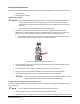
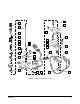
1. Turn the micro-adjustment clockwise until the compression spring touches the top of the
preload screw. Look through the window of the preload screw to see the point of contact. See
Figure 5-9. This is the preload screw point of reference and is equal to zero (0) turns.
Check that the preload locking nut is positioned at its highest position above the preload
screw window while turning (if it is lower, it will restrict movement).
Figure 5-9 Preload Screw Point of Reference
2. From the preload screw point of reference, turn the preload screw the desired number of turns
determined for your application.
3. Use the spanner wrench to tighten the preload locking nut to the top of the cap.
4. Gently turn the micro-adjustment clockwise to seat the needle into the seat extension.
5. Open the micro-adjustment by turning it counterclockwise to the desired setting.
NOTE The preload and micro-adjustment settings will vary for different fluids. Contact
Nordson ASYMTEK Technical Support for particular fluid settings.
To adjust the micro-adjustment setting (Figure 5-10):
The micro-adjustment setting regulates the fluid volume for the dot or line. The higher the setting, the more
fluid is dispensed.
NOTE You must adjust the preload setting before performing this procedure.
1. Using a 0.05-inch hex key, loosen the setscrews on the preload screw.
2. Rotate the inner micro-adjustment column so that the numbered markings face the solenoid valve.