
User guide

34 Maintenance and Service
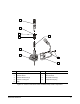
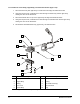
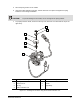
To install the Air Piston and the Needle (Figure 5-7):
1. Prepare the air piston for installation to the upper body as follows:
a. Place the air piston on a flat clean surface.
b. Roll the lip of the air piston so that a lip is formed to hang down toward the upper body.
c. Using the O-ring lubricant, lubricate the seal area of the piston insertion tool and the inlet
area of the upper body.
d. Carefully install the air piston into the piston insertion tool so that the entire air piston is
completely inside the piston insertion tool.
e. Ensure that the air piston is installed without any gaps or folds and is evenly round.
NOTE If the air piston was damaged in the process, replace air piston and repeat
above Steps. If not, continue with next step.
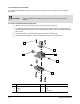
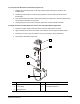
f. Turn the piston insertion tool upside down so that the air piston is facing down towards a flat
clean surface.
g. Using the O-ring lubricant, lubricate the O-ring and install the O-ring in the groove of the
chamfered end of the seal lock-nut.
h. Apply pressure to the seal lock-nut while installing it in the top of the piston insertion tool and
into the air piston for a secure installation.
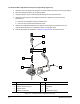
2. Using the O-ring lubricant, lubricate the threads of the needle.
3. Install the air piston on the needle as follows:
a. Place the piston insertion tool, containing the air piston and seal lock nut, on the top of
the needle.
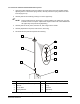
b. Turn the piston insertion tool clockwise a few turns until the seal lock nut engages the
needle threads.
c. Thread the seal lock-nut onto the needle until the lip of the piston insertion tool seats in the
chamber on top of the upper body.
d. Continue to turn the piston insertion tool until it disengages from the seal lock-nut. Remove
the piston insertion tool.
At this point, the top of the seal lock-nut should be 0.46 to 0.51mm (0.018 to 0.020 inch)
above the top of the upper body.
e. Place the notch across the seal lock-nut so that the feet of the piston height gage tool rest on
the upper body surface.
No gap shall be visible under feet or notch. If necessary, correct air piston installation by
repeating Step 3.
4. Gently pull up on the needle approximately 1/8–inch but do not pull the air piston out of
upper body.
NOTE Air piston adjustment is often necessary when you replace the upper body U-cup seal or the
needle. In these cases, follow the disassembly and reassembly instructions in this section,
but do not actually replace the air piston unless it is damaged. Improper air piston
adjustment may result in poor dot quality (dots not breaking off from nozzle).