
User guide

Maintenance and Service 31
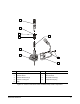
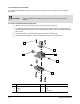
Reassembly of the DispenseJet
The following instructions are the preferred order of reassembly of parts disassembled during the complete
service overhaul. Refer to “Complete Cleaning” earlier in this section when reassembling other parts, if
applicable.
NOTE The DispenseJet should be assembled on a flat surface using appropriate tools and
materials as needed. Ensure all replacement parts are on hand before beginning.
CAUTION! Do not subject the electrical cables to stress during reassembly. Damaged cables
cannot be replaced separately and can only be replaced with the next higher
assembly.
CAUTION! Do not re-use a removed U–cup seal. It is usually damaged. Handle new O-rings
and seals carefully. If O-rings or seals are damaged, leakage or premature
DispenseJet failure may occur.
NOTE The screws should be tightened to a torque of 0.34 to 0.56 N-m (3 to 5 in-lbs) except where
noted in the assembly instructions. New O-rings must be treated with an O-ring type
lubricant.
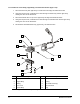
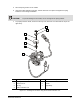
To reassemble the Lower Body (Figure 5-5):
1. Install the luer-lock on the lower body ensuring that the fluid intake port is facing correctly.
2. Install the U-cup seal on the lower body as follows:
a. Make sure the springy side of the U-cup seal is facing out so that the inside metal part is
visible after the U-cup seal is fully installed.
b. Using the ring and seal insertion tool, carefully seat the U-cup seal into the lower body.
3. Install the small and large O-rings as follows:
a. Using the ring and seal insertion tool, carefully seat the O-rings on the U-cup Seal in the
lower body.
4. Set aside the assembled lower body.
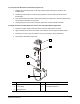
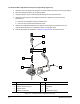
To reassemble the Upper Body (Figure 5-5):
1. Install the U-cup seal to the upper body as follows:
a. Make sure the springy side of the U-cup seal is facing out so that the inside metal part is
visible after the U-cup seal is fully installed.
b. Using the ring and seal insertion tool, carefully seat the U-cup seal into the upper body.
2. Using a flat-head screwdriver, install the fitting and plug on the upper body.
3. Install the air hose to the fitting on the upper body ensuring a secure connection.
4. Set aside the assembled upper body.