
User guide

28 Maintenance and Service
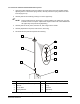
To disassemble the Lower Body:
To remove and disassemble the lower body, follow the instructions under “Complete Cleaning” earlier in
this section.
CAUTION! To prevent damage to the tapered needle, do not use tools to grip the needle
threads.
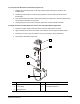
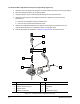
To remove and disassemble the Upper Body:
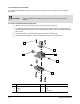
1. Remove the two screws securing the cap to the upper body (Figure 5-3).
2. If not already removed, remove the two screws securing the lower body to the upper body and
carefully separate the lower body from the needle and set it aside. Leave the needle in the upper
body for now.
3. For future reference, note the fitting and plug locations on the upper body.
4. Using a flat head screwdriver, remove the fitting and the plug from the upper body.
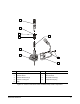
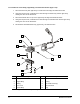
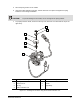
Item Description Item Description
1 Hex Head Screw (two) 4 Upper Body
2 Fitting 5 Plug
3 Cap 6 Lower Body
Figure 5-3 Disassembly of Upper and Lower Bodies.
1
2
3
4
5
6