
User guide

Maintenance and Service 25
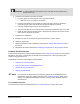
CAUTION! To prevent damage to the extension seat, verify that the micro-adjustment is
opened 4 to 6 turns.
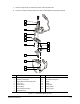
3. Install the seat extension and heater as follows:
a. If needed, apply conductive grease on the seat extension shaft.
Make sure not to put grease on the threads.
b. Insert the seat extension into the heater by rotating the seat extension to spread the
conductive grease evenly and prevent the formation of trapped-air pockets.
c. Carefully, install the large O-ring on the seat extension.
d. Align the dowel-pinhole on the seat extension so that it faces toward the rear of the valve.
e. Install the seat extension with the heater to the upper body using the two screws and the
7/64-in hex key to tighten the screws.
4. Install the micro-adjustment.
5. Install the luer-lock into the lower body of the DispenseJet so it faces upward.
6. Attach the purge screw.
7. Adjust the preload and micro-adjustment as described in “Settings and Adjustments” later in
this section.
8. Reinstall the DJ-2100 as described in “Installing the DispenseJet” in the Installation section.
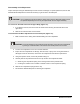
Complete Overhaul Service
This procedure is intended to remedy problems identified in the Troubleshooting section such as replacing
damaged or worn parts, or restoring the functionality of the DispenseJet by a thorough cleaning after
continuous long production runs.
The following is covered in the Complete Overhaul Service:
• Disassembly of the DispenseJet
• Inspection and Cleaning of Disassembled Parts
• Reassembly of the DispenseJet
• Settings and Adjustments
NOTE For removal of the DispenseJet from dispensing system and for initial disassembly of
DispenseJet components, follow instructions under “Complete Cleaning” earlier in this
section. Only additional disassembly, inspection, cleaning, and re-assembly steps are
described here.
Tools and Material Needed:
Use the same list of tools and materials listed in the “Complete Cleaning” earlier in this section.