
User guide

24 Maintenance and Service
Inspecting and Cleaning
1. Use a cotton-swab to remove excess material from the seat extension, lower body, connector
and luer-lock.
2. Further clean the seat extension, lower body, purge screw, and the luer-lock in a solvent bath
ultra-sonic cleaner.
CAUTION! Protect the solenoid valve from contact with material or solvent.
Contamination could cause solenoid failure.
3. Wipe the needle clean with a solvent-soaked disposable towel.
4. Use an air gun to blow excess material from the DispenseJet fluid paths into a disposable towel.
CAUTION! Do not use metal objects when cleaning the lower body, Heater, and Seat
Extension. Damage to these parts may result.
5. Carefully inspect the interior of the cleaned components to ensure they are free from fluid
residue and solvent. Repeat the steps above if parts are not clean.
CAUTION! The Needle and Seat Extension is a precision-fitted set. If one item is worn
or damaged, you must replace both items. Do not mix parts from the old set
with the new set.
6. Clean the nozzle by following the instructions for "Cleaning the Nozzle" earlier in this section.
7. If desired, clean the solenoid valve by wiping it with a dry disposable towel while it is installed on
the Z-Head mounting plate (valve bracket).
8. Carefully inspect the O-rings and U-cup seals for wear or damage. Replace if needed.
9. You are now ready to reassemble the components and the DispenseJet.
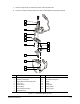
Reassembling and Reinstalling the DispenseJet
After the components and parts have been cleaned and worn or damaged parts have been replaced, the
DispenseJet can be reassembled and reinstalled. See Figure 5-1.
To reassemble and reinstall the DispenseJet:
NOTE The screws should be tightened to a torque of 0.3 to 0.6 N-m (2.7 to 5.3 in–lbs) except
where noted in the assembly instructions. New or cleaned O-rings must be treated with an
O-ring lubricant.
1. Gather the DispenseJet components, parts, and replacement parts if any, on a flat surface.
2. Reassemble the lower body and the upper body as follows:
a. Carefully, insert the U-cup seal and small O-ring into the lower body.
b. Carefully attach the lower body to the upper body and secure using the two screws.