
User guide

22 Maintenance and Service
5. Disconnect the black pneumatic line, solenoid valve, and heater/temperature controller
connections from the bulkhead. See Figure 3-3.
6. Remove the two mounting screws securing the DispenseJet to the dispensing system.
7. Place the DispenseJet on a suitable flat surface or workbench for cleaning and inspection.
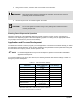
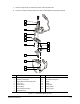
Disassembling the DispenseJet
Cleaning and inspection require disassembly of major components and small and intricate parts of the
DispenseJet. Refer to Figure 5-1 unless otherwise noted.
To disassemble the DispenseJet:
1. Using the provided torque wrench, remove the nozzle.
2. Loosen the micro-adjustment as follows:
a. Turn the micro-adjustment cap 4 to 6 turns counterclockwise.
b. Use the spanner wrench to loosen the locking nut.
c. Turn the preload screw to relieve compression on the compression spring.
3. Remove the seat extension and heater as follows:
a. Use the hex key to remove the two screws securing the heater and the seat extension to the
lower body.
b. Separate the seat extension from the heater.
c. Remove the exposed large O-ring.
d. Set aside the disassembled parts for cleaning.
CAUTION! Handle O-rings and seals carefully. If O-rings or seals are damaged,
leakage or premature DispenseJet failure may occur.
NOTE The seat extension has special thermally conductive grease applied to the non-
threaded portion of the shaft. If the grease is accidentally removed, apply new
conductive grease.
4. Remove the lower body as follows:
a. Use the 7/64-inch hex key to remove the two screws from the lower body.
b. Carefully pull the lower body off the needle.
c. Remove the exposed small O-ring that holds the U-cup seal in place.
Leave the U-cup seal intact.
d. Remove the purge screw.
e. Set aside the disassembled parts for cleaning.
5. Inspect the exposed needle and U-cup seal for damage as follows:
a. Look for uneven roundness of the U-cup seal or signs of wear that prevents a good seal.
Replace the U-cup seal if necessary.
b. Look for a broken needle tip or signs of wear marks such as polished streaks on the metal
where it meats the U-cup seal. Replace if necessary.
6. Remove the luer-lock from the lower body by unscrewing it and set it aside for cleaning.