
User guide

Maintenance and Service 21
Complete Cleaning
Typically, complete cleaning is recommended on a monthly basis. However, the cleaning schedule may vary
depending on your application and production environment.
The following steps are necessary when performing a complete cleaning:
• Removing the DispenseJet from the dispensing system
• Disassembling the DispenseJet
• Inspection and Cleaning
• Reassembling and Reinstalling the DispenseJet
Tools and Material Needed:
• Adjustment and Assembly Tools
• Cleaning Tools
• Air Gun
• O-ring Lubricant
• Conductive Grease
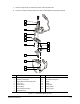
Removing the DispenseJet from the Dispensing System
CAUTION! Do not subject the electrical cables to stress during the disassembly. Damaged
cables cannot be replaced separately and can only be replaced with the next higher
assembly.
To remove the DispenseJet:
1. Power up the dispensing system.
2. Purge any remaining fluid from the reservoir.
a. Use the position controls to move the DispenseJet so it is directly over an open purge station
(or click on
PURGE from the Fluidmove software) to purge the fluid from the fluid lines. If
necessary, refer to the Fluidmove User Guide for instructions.
b. Manually activate the solenoid valve by pressing the push-button underneath the solenoid
valve to flush out all fluid in the fluid system, lines, syringe, or reservoir.
3. Lower the fluid pressure to zero (
0) and disconnect the clear pneumatic line (fluid pressure) and
remove the syringe.
CAUTION! Follow Material Safety Data Sheet (MSDS) recommendations for the proper
handling and disposal of fluids.
4. Shut down the dispensing system.
Refer to the manual applicable to your dispensing system when performing steps 3 and 4.
If the micro-adjustment assembly is set to a specific setting, make a note of this setting for
future reference.