
User guide

20 Maintenance and Service
Cleaning the Nozzle
The nozzle should be cleaned after approximately 8 to 10 hours of normal use. This may vary depending on
the type of fluid.
Tools and Materials Needed:
• Torque Wrench
• Nozzle Brush
• Air Gun
• Solvent
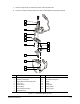
To remove the nozzle:
1. Power up the dispensing system.
2. If fluid is present in the reservoir or the syringe, obtain a suitable fluid collection container and
disposable towels for draining of fluid.
3. Use the position controls to manually move the DispenseJet so it is directly over the purge
station (or click on
PURGE from the Fluidmove software) to purge the solvent from the fluid lines.
Refer to the Fluidmove User Guide or Online Help for instructions.
4. Manually activate the solenoid valve by pressing the push-button underneath the solenoid valve
to flush out all fluid in the fluid system, lines, syringe, or reservoir.
5. Using the supplied torque wrench, carefully remove the nozzle.
To clean the nozzle:
1. Place the nozzle in a container with a small amount of solvent.
If unsure about the solvent type, contact your material supplier or MSDS for
recommended solvents.
2. Carefully insert the nozzle brush into the nozzle and gently agitate the interior surface.
3. Using a dry air gun, carefully blow air through the nozzle to clear fluid from the interior and into a
disposable towel.
4. Submerge the nozzle in an ultrasonic cleaning system to remove any remaining residue.
5. Using a magnifier or microscope, inspect the nozzle interior for residue and scratches. If worn,
replace it. If clean and undamaged, proceed with reinstalling the nozzle. Otherwise repeat
Steps 1 to 5.
To reinstall the nozzle:
NOTE If you are not going to use the cleaned nozzle right away, store the nozzle in its place in the
protective case for the DispenseJet.
1. Using the supplied torque wrench, carefully install the nozzle.
2. If desired, perform the “Preparing the DispenseJet for Fluid Dispensing” procedure in the
Operation section.