
User guide

16 Operation
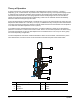
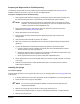
6. Slide the receiver head onto the flat end of the syringe and tighten it.
7. Place the tip of the syringe securely into the luer-lock.
NOTE It is important to position the receiver head so that the long sides are parallel to the
X-axis rods. If it is slanted or perpendicular to the X-axis, the receiver head will hit the
Z-head during dispensing.
8. Tighten the thumbscrew on the syringe bracket.
CAUTION! Do not over-tighten the syringe thumbscrew. Over-tightening may cause the
syringe to deform, forcing large amounts of fluid into the fluid chambers.
9. Connect the clear line from the receiver head to the clear (leftmost) line on the dispensing head.
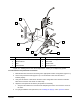
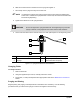
Item Description Item Description
1 Receiver Head 3 Syringe Tip
2 Syringe 4 Clear Pneumatic Line (Fluid)
Figure 4-3 Syringe with Receiver Head Attached
Changing Fluids
To change the fluid:
1. Drain the fluid lines.
2. Using the supplied torque wrench, carefully remove the nozzle.
3. Purge (flush, or clean) the DispenseJet as appropriate. Refer to the Maintenance and Service
section.
Purging and Priming
Regular priming and purging of the DispenseJet is essential for dot consistency. Use the following
procedures when you install a new syringe or remove air trapped in the lower body.
1
2
3
4