
User guide

Operation 15
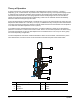
Preparing the DispenseJet for Fluid Dispensing
The following assumes that the correct nozzle has been selected and installed. See the Appendix for
available nozzles for the DJ-2111, DJ-2112, and DJ-2114 DispenseJets.
To prepare the DispenseJet for fluid dispensing:
1. Verify that the nozzle functions properly by activating the solenoid valve either manually using
the solenoid valve push button or automatically from the dispensing system software.
NOTE The solenoid valve has a push-button underneath it that you can press for manual
activation. You should feel a jet of air bursting out. Listen for the DispenseJet needle
to make contact with the micro-adjustment stop.
2. Connect the fluid syringe or fluid reservoir line to the luer-lock on the lower body of the
DispenseJet. See “Installing the Syringe” below.
3. Set the fluid pressure to 34.5 kPa (5 psi).
4. Turn the Heater Controller located inside the dispensing system lower cabinet to the
ON (I) position.
5. Verify that the Heater Controller is preset to 35
o
6. Allow 4 to 5 minutes for the temperature to reach its set point before starting the DispenseJet
operations.
Celsius.
7. To prime the DispenseJet with fluid before beginning operations, proceed as follows:
a. Using the position controls, manually move the Z-head so that the DispenseJet nozzle is
directly centered over the purge station lid.
b. Activate the solenoid valve by pressing the push-button underneath the solenoid valve until
fluid begins to flow out of the nozzle in an even stream.
c. Gently, wipe the fluid from the end of the nozzle with a disposable towel.
8. Set the fluid pressure to the recommended setting for your fluid. Typically, between 7 to 69 kPa
(1 to 10 psi).
9. Perform a Prompted Setup or Valve Offset Routine. Refer to the Fluidmove User Guide or
Online Help for assistance.
Installing the Syringe
To install the Syringe:
This procedure assumes you are using the same fluid. If you are changing fluids, see “Changing Fluids” later
in this section.
1. If required, allow fluid to reach room temperature (refer to the MSDS for your fluid requirements).
2. Inspect the fluid in the syringe for air bubbles.
NOTE Do not use any fluid with visible air bubbles, as these will cause fluid voids and
dispensing irregularities.
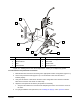
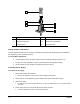
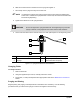
3. Remove the orange cap from the flat end of the syringe. See Figure 4-3.
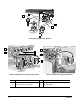
4. Check that the syringe has either an orange no-draft follower (preferred) or a yellow follower.
5. Remove the syringe tip cap.