
User guide

Operation 13
Operating Instructions
Prior to using the DispenseJet for production runs, it is recommended that you conduct a brief test-run to
verify that adjustments and parameters are set for optimum performance.
NOTE Read the entire section before operating the DispenseJet. The sequence of events may vary
for your particular application.
CAUTION! Operations should be performed by trained personnel only.
Tools and Material Needed:
• Adjustment and Assembly Tools
• Nozzle Kit
• Appropriate solvent and containers for the selected dispensing fluids
• Personal Protective Equipment
DispenseJet Setup Adjustments
There are two prerequisite minor adjustments that must be performed on the DispenseJet.
• Preload Setting
• Micro-Adjustment Setting
NOTE For major adjustments, you need to remove and disassemble the DispenseJet. It is best to
make major adjustments before installing the DispenseJet on the dispensing system. See
“Settings and Adjustments” in the Maintenance and Service section.
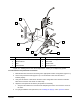
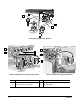
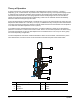
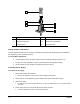
Setting the Preload
To set the DispenseJet Preload:
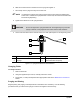
1. Back off the micro-adjustment by turning it counterclockwise.
2. Count the number of times you completely turn the preload screw (Figure 4-2) downward from its
current position to regulate the desired space for the preload setting.
TIP It is best to determine the smallest dot to be dispensed before you set the preload.
Typically, too little tension or too much tension will result in poor dispensing results.
3. Twist the preload locking nut all the way up on the preload screw so that it rests against the cap.
4. Using the spanner wrench (included in kit), turn the preload locking nut until it stops.