
User guide
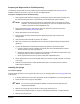

Installation 9
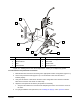
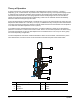
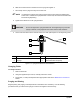
Item Description Item Description
1 Syringe Bracket 5 Set Screw Mounting Holes
2 Bracket Mount 6 RTD Cable
3 Pins 7 Heater Cable
4 Valve Bracket 8 Mounting Screws
Figure 3-2 Installing the DJ-2100 Series DispenseJet - Century C-718 Dispensing System
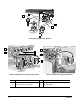
To make electrical and pneumatic connections:
1. Make the electrical connections according to the appropriate machine configuration (Figure 3-3).
2. Connect the pneumatic hoses (Figure 3-3). You should hear a click when the hose is
inserted properly.
3. Verify that “DJ-Series” is selected as the active valve configuration in the Fluidmove software.
Refer to the Fluidmove User Guide or Online Help.
4. Adjust the valve pressure and test the jet operation as necessary.
Verify that the cables and connections are adequately secured to account for the motion of
the robot.
5. For syringe installation and replacement, see “Installing the Syringe” in the Operation section.
1
2
3
4
5
6
7
8