
User guide

8 Installation
Installation Instructions
If the DJ-2100 Series DispenseJet was factory installed, you can proceed directly to the Operation section
after removing all packing material from the Jet. If not, proceed as follows:
Installing the DispenseJet
The instructions below are for the standard SMA application platform, the C-718 Dispensing System.
Installations on other dispensing systems such as the M-2000 and X-1000 series may vary slightly.
CAUTION! The DJ-2100 Series DispenseJet is a delicate precision instrument. Exercise care
when installing the DispenseJet. Failure to do so may cause damage to the
DispenseJet. Installation should be performed by trained personnel only.
Tools and Materials Needed:
• Adjustment and Assembly Tools
• Torque Wrench
• Nozzles
To install the DispenseJet:
1. Remove any existing pumps or valves from the dispensing system by following the instructions
in the applicable manuals. Make sure to drain all fluids and solvents from the fluid system line.
2. If not already installed, obtain and install the correct Z-head Mounting Plate (Valve Bracket) and
Bracket Mount for the dispensing system. Refer to the Appendix for part numbers.
NOTES The DJ-2100 comes with factory-set preload and micro-adjustment settings. Minor
adjustments may be made with the DispenseJet installed. See “Settings and
Adjustments” in the Maintenance and Service section for instructions on performing
major adjustments.
TIP If you will be using silver filled epoxy (SFE) or abrasive fluid applications, it is
suggested that you use the gray U-cup seal instead of the yellow U-cup seal in the
lower body. See the Appendix for part numbers and ordering information
.
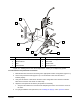
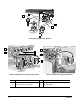
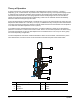
3. Install the DJ-2100 as follows:
a. Remove the DispenseJet, accessories, and the provided tools from the protective case and
place these on a suitable flat surface or workbench.
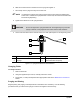
b. Place the DJ-2100 so that the two protruding pins on the valve bracket mate with the detents
on the back of the DispenseJet (Figure 3-2).
c. Using a 3-mm hex wrench and removable thread-locking adhesive, install the two mounting
screws to secure the DispenseJet to the valve bracket. Tighten the screws securely.