
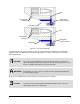
Owner's manual
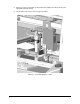
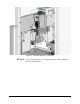


Cleaning the Nozzle Plate and Fluid Channel
CAUTION! Each jet and its associated nozzle plate are precisely aligned at the factory and
delivered as a matched assembly with identical serial numbers on the jet and the
nozzle plate. Be careful not to accidentally interchange jets and nozzles when
cleaning or performing maintenance.
WARNING! After removing the screws, do not use tools to remove the nozzle plate from the
jet. Using tools can cause serious damage. Always pull the nozzle plate down
vertically, to avoid bending the rod.
When the nozzle plate is removed, be careful not to damage the exposed rod and
sealing ball, as this could result in leakage.
1. Complete the fluid channel rinsing process as described previously.
2. Disconnect all electric and pneumatic lines.
3. Remove the nozzle plate.
! The fluid channel, sealing ball and threads can be cleaned with cleaning fluid, a lint-free
cloth, a cotton swab and a pipe cleaner.
4. Clean the nozzle plate and screws
! For a thorough cleaning of the nozzle, ultrasonic cleaning is recommended.
5. With the nozzle plate removed, rinse the jet with cleaning fluid.
6. Clean the fluid channel thoroughly with recommended brushes and swabs.
7. Blow out the fluid channel of the jet with pressurized air.
8. Reassemble the nozzle plate (don’t forget the O-ring).
9. Connect the DJ-100 to the dispense platform.
Testing for Leaks
Always check for leaks after performing the cleaning procedure.
1. Replace the fluid being dispensed with the appropriate cleaning fluid.
2. Close the valve and pressurize the fluid reservoir to approximately 6 bar (87 psi).
3. No fluid should be visible at the nozzle. If fluid is visible, repeat the cleaning procedure.
4. If the jet leaks, check the nozzle seat with a magnifying glass for any remaining
contamination, particles and damage and remove contaminants. Replace all fluid lines from
the reservoir to the jet.
5. If the jet still leaks, contact Asymtek for technical assistance.
13