
Owner's manual


Installing/Changing a Fluid Syringe
Tools and Materials Needed
• Clean Cloth and Solvent (for spills) • Syringe of Fluid to be Dispensed
• 10mm Wrench or Pliers (as needed) • Appropriate Personal Protective Equipment
" NOTE If changing fluid types, you must first clean the jet in accordance with “Cleaning the DJ-
100
” in the Maintenance and Service section.
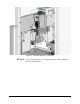
1. Use position controls to move the dispensing head to the front center of the dispensing area.
2. Perform a production shutdown as specified in the applicable dispensing system manual.
! If there is no syringe installed, skip to Step 6.
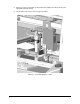
3. Disconnect the syringe air hose from the FLUID AIR connector on the bulkhead.
4. Remove the syringe receiver head from the empty syringe and unscrew the empty syringe
from its fitting.
! If the fitting turns with the syringe, use a small wrench or pair of pliers (as applicable) to
hold the fitting while unscrewing the syringe.
5. Remove the syringe and discard it in accordance with local regulations.
6. Obtain a new syringe and inspect the fluid for voids. If voids are present, obtain another syringe.
7. Remove the syringe cap and hold the syringe tip-side-down to allow the fluid to completely fill
the syringe tip.
8. Slide the new syringe down through the syringe clip and screw it onto the syringe fitting.
! There should be no fluid voids at the top of the syringe fitting. If any material seeps over
the fitting, clean the fitting with a cloth and recommended solvent.
9. Screw the receiver head onto the top of the new syringe.
10. Connect the syringe air hose to the FLUID AIR connector on the dispensing head bulkhead.
11. Perform a dispensing system start-up as specified in the applicable dispensing system
manual.
10