
Owner's manual


4 Installation
The DJ-100 is designed for use on Asymtek’s Axiom X-1000, DispenseMate 580 Series, Spectrum S-820
Series, and Spectrum S920 Series Dispensing Systems.
"NOTE For more information, refer to the manual for your particular dispensing system.
Unpacking the DJ-100
Every care has been taken when packaging your DJ-100. However, we recommend that you look for
obvious damage and verify contents against the packing slip.
Retain the case for storage of the DJ-100 and accessories. Retain shipping cartons for future use.
If an item needs to be returned to Asymtek, obtain a Return Material Authorization (RMA) number
from Asymtek.
Installing the DJ-100
If your DJ-100 series jet was factory installed, you do not need to perform this procedure.
Tools and Materials Needed:
• Flat-head screwdriver
• 3 mm hex wrench
• 4 mm hex wrench
"NOTE Prior to installation, use the software or dispensing system position controls to move the
dispensing head to the front center of the dispensing area. Perform a service shutdown as
specified in the applicable dispensing system manual. Remove any jet currently installed
on the dispensing head. If the jet bracket installed is incompatible with the DJ-100,
remove it. Refer to the installation/removal procedures in the applicable jet manual if
necessary.
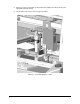
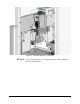
1. Mount the DJ-100 on the dovetail bracket and tighten with the 4-mm hex wrench.
2. Make the electrical connections according to the appropriate machine configuration shown in
Figure 4-1 and Figure 4-2.
3. Connect the pneumatic hoses as shown in Figure 4-1 and Figure 4-2. You should hear a click
when the hose is inserted properly.
"NOTE Verify that the cables and connections are secured adequately to account for
the motion of the robot.
4. Connect to the respective fluid supply source (e.g. small cartridge fitting). The syringe must be
installed to connect the clear fluid line. See "
Installing/Changing a Fluid Syringe" in the
Operation section.
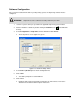
5. Set temperatures within the Fluidmove software. See "
Software Configuration" later in this
section for specific instructions.
6. Select the appropriate active valve configuration in the Fluidmove Valve Setup Screen. See
"
Software Configuration" later in this section for specific instructions.
7. Test the jet operation as necessary. Refer to the Fluidmove User Guide or consult with a
trained operator.
7