
Instruction Manual


DG-1000 Dispenser
24
E1998 Nordson Corporation
All rights reserved
107 156C
Issued 11/98
Manual 12-35
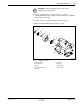
See Figure 2.
1.Use the socket head screws (4) to secure the dispenser (5) to the
robot mounting plate (2).
2.Connect these connectors to the dispenser (5):
Sheater connector (7)
Ssolenoid valve connector (1)
3.Connect the air line (8) to the dispenser (5).
4.Connect the fluid line (6) to the dispenser (5).
5.Calibrate the micro-adjustment assembly (3), if necessary. Refer to
How to Calibrate the Micro-Adjustment Assembly
in this manual.
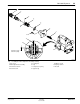
After rebuilding the dispenser you must calibrate the micro-adjustment
cap. Turning the micro-adjustment cap clockwise decreases the piston
and needle travel, which decreases coating material flow. Turning the
micro-adjustment cap counterclockwise increases the piston and needle
travel, which increases coating material flow.
If you noted the original setting, set the micro-adjustment to that setting.
Otherwise perform these steps:
1.Turn the micro-adjustment cap to gently seat the needle into the
extension.
2.Open the micro-adjustment cap
1
/
2
-turn counterclockwise.
3.Cycle the dispenser and check for air leaks. Refer to your Select
Coat
system manual for procedures.
8. Installation
9. Micro-Adjustment
Assembly Calibration