
Instruction Manual


DG-1000 Dispenser
20
1998 Nordson Corporation
All rights reserved
107 156C
Issued 11/98
Manual 12-35
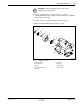
See Figure 6.
1.Insert the needle (7) through the seal in the upper body (8) and the
internal seal in the lower body (9). The needle is properly seated
when the needle ball is almost flush with the end of the heater
extension.
2.To properly seat the piston in the piston insertion tool (4), roll the seal
lip (5) of the new air piston (6) on a clean flat surface. The seal lip
must be formed so that the lip hangs down toward the dispenser.
3.Coat the seal area of the piston insertion tool (4) with Parker O-ring
lubricant or equivalent. Install the piston assembly into the insertion
tool. Make sure the entire assembly fits into the tool.
4.Make sure that the seal lip (5) is round. No gaps or folds can be
between the piston insertion tool (4) bore and the seal lip. Replace
the air piston, if necessary.
5.Place the piston insertion tool (4), piston side down, on a flat surface.
6.Lubricate the O-ring (3) with Parker O-ring lubricant or equivalent.
Install the O-ring in the groove of the chamfered end of the seal lock
nut (2).
7.Lubricate the air piston (6) with Parker O-ring lubricant or equivalent.
Press the seal lock nut (2) into the top of the piston insertion tool (4)
and into the air piston. You must apply pressure to insert the seal
lock nut and make it secure.
8.Place the piston insertion tool (4) onto the top of the needle (7). Turn
the piston insertion tool clockwise, applying downward pressure on
the needle. Thread the seal lock nut (2) onto the needle (7) until the
lip of the tool seats in the chamfer on top of the upper body (8).
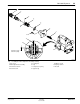
9.Continue winding the air piston (6) into the bore until the tool
disengages from the seal lock nut. See Figure 7. The top of the seal
lock nut should be flush to within 0.010 in. above the top of the upper
body(8).
10.See Figure 6. Pull up on the needle approximately
1
/
8
in. Do not pull
the air piston(6) out of the bore.
Air Piston