
Instruction Manual

Installation 4-3
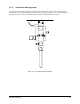
5. Use the 9/16-inch wrench to remove the four (4) bolts that anchor the dispensing system to
the floor of the crate.
! There are two anchor brackets on the left side of the dispensing system, and two on the
right side.
6. Use the 7/16-inch wrench to remove the eight (8) bolts that hold the four anchor brackets
onto the sides of the dispensing system.
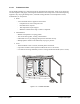
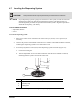
7. Use a forklift to gently lift the dispensing system off of the pallet.
"NOTE Lift the dispensing system from the bottom, between the feet.
8. Place the dispensing system over the installation site, but do NOT lower the forklift at
this time.
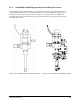
9. Adjust the forklift height until the dispensing system is approximately at the required height.
"NOTE The dispensing system Levelers should not be touching the ground. If any of the Levelers
are touching the ground, use the adjustable wrench to raise them by turning the adjusting
nut counter-clockwise.
10. With the dispensing system at the approximate height and none of the feet touching the
ground, use the 9/16-inch wrench to loosen each pair of leg bolts located on each side of the
dispensing system.
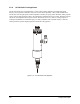
"NOTE Each leg should drop down after the bolts have been loosened. You should not have more
than 2 to 3 inches of leg showing.
11. When all four feet are firmly and flatly on the floor, use the 9/16-inch wrench to tighten all
four pairs of leg bolts.
12. Gently lower the forklift.
CAUTION! Use extreme caution when lowering the forklift blades. Stop lowering the blades if
the dispensing system begins to tilt. Raise the dispensing system back to the
required height and tighten the leg bolts.