
Instruction Manual


10-14 Parts Replacement
10.10 Replacing Control Modules
CAUTION! This procedure should only be performed by a trained service technician.
Tools and Materials Needed
1/8-Inch Hex Key Removable Thread Locker (P/N 40-0019)
Clean Soft Cloth
To remove and replace a Control Module:
1. Perform a service shutdown as described 6.9.2.4 Service Shutdown.
WARNING! Make sure that all electrical and pneumatic power supplies have been turned off
and disconnected as described in 6.9.2.4 Service Shutdown. Failure to do so
may cause serious injury or death.
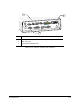
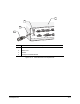
2. Open the rear cabinet door of the dispensing system and locate the failed module.
3. Check to make sure that all of the cables and pneumatic tubes (if applicable) are labeled. If a
cable or pneumatic tube is not labeled, label it according to its corresponding receptor.
4. Disconnect all cables and pneumatic tubes (if applicable) from the module.
! To disconnect a pneumatic tube, push in the collar around the port and pull out the tube.
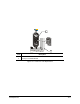
5. Use a 1/8-inch hex key to remove the four screws attaching the module to the frame.
CAUTION! When removing the module from its slot in the rear cabinet, support the module
to prevent it from dropping. Dropping the module may damage internal parts.
6. Slide the module out of the rear cabinet.
! The Conveyor Controller Module also has a cable connection on the backside that
connects to the Control Panel. Disconnect this cable before sliding it all the way out of its
slot.
7. Clean any dust and debris from the floor of the cabinet using a cloth dampened with water or
ammonia-based cleaner.
8. Gently slide the new module into the same slot from which you removed the old module.
! For the Conveyor Controller Module, reinstall the cable connection on the backside
before sliding the module all the way into its slot.