
Instruction Manual


6-8 Operation
6.7 Conveyor Operations
6.7.1 Chain Conveyor (C-740)
The chain conveyor, standard on the Century Series C-740 Dispensing System, transports the workpiece
into and out of the dispensing system. Operation of the conveyor is automatic during production runs. An
optical sensor detects the part as it arrives, triggering the Conveyor Controller Module to activate the Stop
Pin to stop the part at the correct location. Board pins in the dispense zone secure the part in place during
fluid dispensing.
" NOTE The C-741 batch system has a tooling plate or adjustable tooling rails to secure the
workpiece for dispensing operations.
6.7.1.1 Conveyor Adjustments
The conveyor should not need adjustment during normal operation. However, during programming, or
when replacing conveyor parts or changing the type/size of the workpiece, you may need to move the
conveyor chain left or right, or adjust the distance between the conveyor rails.
To move the conveyor chain left or right:
1. Press
CONVYR ENABLE on the Control Panel.
! The conveyor LED blinks when the conveyor control is active.
2. Press the left or right arrow on the Control Panel to move the conveyor chain left or right,
respectively.
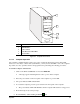
To manually adjust the distance between conveyor rails:
1. Loosen the Width Adjustment Clamp (
Figure 6-4).
2. Manually turn the hand crank clockwise or counterclockwise as needed.
! Turning the hand crank clockwise increases the distance between the rails.
! Turning the hand crank counterclockwise decreases the distance between the rails.
3. When you are satisfied with the distance between the rails, tighten the Width Adjustment
Clamp.