
User guide


4-22 Operation
To adjust the fluid pressure/valve pressure:
1. Verify that the dispensing system is ON.
> The Dispenser Status LED and Light Beacon should be yellow or green.
2. Open the front doors.
> The green Dispenser Status LED and Light Beacon will turn yellow.
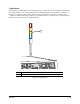
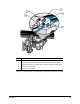
3. Reach underneath the left side of the front hood of the dispensing system and pull the fluid
pressure regulator down to unlock it.
4. Rotate the regulator counter-clockwise to set the fluid pressure to 0 kPa (0 psi).
5. While watching the gauge, rotate the regulator as follows:
> Clockwise (right) to increase pressure up to the desired level.
> Counter-clockwise (left) to decrease pressure. To avoid false readings, lower the pressure
past the target level, then rotate the regulator clockwise (right), to raise pressure up to the
desired setting.
6. Push the regulator up to return it to the locked position.
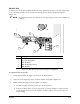
Configuring a Digital Pressure Gauge
The following describes how to initialize settings for a digital pressure gauge. The keys below the LCD
display let you adjust the display mode (analog or digital) the output mode, and the unit of pressure.
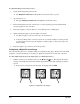
To enter initial setting mode for the digital gauge (see illustrations below):
1. While in sensing mode, simultaneously press the
Mode and keys. This displays the initial
settings on the LCD readout. The first settable digit (farthest to the right) will begin to blink on
and off.
> If the sensor is being used for the first time, the display will read PHd.
Figure 4-8 Digital Pressure Gauges