
User Manual


7-4 Maintenance
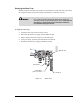
Replacing the Purge Boot
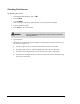
To replace the purge boot:
1. Lift off the purge station lid (see Figure 7-2 Purge Boot Close-up). If the system is
running, the lid will be held down by a partial vacuum.
2. Using fingers or a needle-nosed pliers, grip the top of the purge boot and pull it out from
the top of the lid. Tearing the boot will not cause a problem, as it is being replaced.
3. Obtain a new boot.
> If using a nozzle, use an olive-colored boot.
> If using a needle, the inside diameter should be compatible with the diameter of the
needle (see Table 7-2).
4. Insert the new boot into the top of the lid, narrow end first.
5. Push the boot downward through the hole in the lid until it starts to emerge from the
bottom.
6. Using fingers or a needle-nosed pliers, grip the bottom of the boot and pull gently
through the hole until it is fully seated. If the bottom end of the boot is scored as you
pull it through, no problem, but the top of the boot must be undamaged.
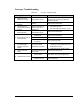
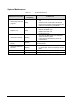
Table 7-2 Purge Boot Colors and Sizes
Purge Boot Color Inside Diameter
Orange 0.5 mm (0.020 in)
Pink 0.8 mm (0.031 in)
Green 1.1 mm (0.045 in)
Olive* 3.0 mm (0.120 in)
*Recommend size for nozzles.