
User Manual


12-8 Needle Heater
To install the heating element:
1. Loosen the thumbscrew on the front of the heating element.
2. Do one of the following, depending on your type of heating element:
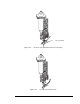
> For the HT-04, slide the heating element onto the needle and onto
the valve tip.
> For the HT-06, slide the heating element onto the needle and onto
the Luer lock fitting (call Asymtek and ask for the Luer Lock adapter--see Figure
12-8).
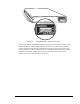
> For the HT-10N, insert the needle into the side slot of the heating element.
The heating element attaches directly to the needle (see Figure 12-9).
CAUTION!
Do not over-tighten the thumbscrew. Over-tightening could damage
the needle.
3. Tighten the thumbscrew on the front of the heating element.
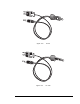
4. On M-2000 and Millennium Series dispensing systems equipped with needle heaters,
plug the J-type Thermocouple Cable and the Needle Heater Power Cable into the
power outlets on the dispensing head.
> On M-2000 Series dispensing systems, the Needle Heater power outlet is labeled
Heater 1 or Heater 2 (one for each valve if two valves are present). On other
Millennium Series dispensing systems, the Needle Heater power outlet is labeled
Needle Heater.