
Manual


Height Sensor 10-9
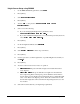
Probe Adjustments
Depending on the dispensing pattern, the substrate material, and/or the needle size, you may
need to adjust the probe height in relation to the needle height, the distance between the
probe tip and the needle tip, or the stroke length of the up and down motion of the probe.
These adjustments can improve throughput and dispensing quality.
Before attempting any of these adjustments, consult a service
technician.
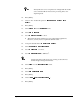
Probe Height Adjustments
An operator can make small-scale adjustments to probe height using the micrometer
adjustment. Only a service technician should make large-scale adjustments to probe height.
Service technicians can also adjust the distance between the probe tip and the needle tip, as
well as the Gear Up (GU) stroke length, if necessary. Normally, the GU stroke length should
not need adjustment. Service technicians can also adjust the Z-Axis velocity and
acceleration. The Z-Axis velocity and acceleration values are applied to the dispense head
during a height sense and can increase throughput. See the specifications on page 10-16 for
more information.
Tools and Materials Needed
•
1/16 inch hex key
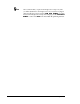
To make small-scale adjustments to the probe tip height:
1.
Install the needle you will be using.
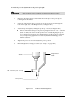
2.
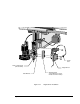
Loosen the micrometer locking screw (see Figure 10-1).
3.
Turn the micrometer to raise or lower the probe.
In FMDOS Always Mode, the recommended probe height is 1.78 mm
(0.07 in) below the needle tip. In Selective Mode, the recommended probe
height is 2.54 mm (0.10 in) below the needle tip (see Figure 10-3).
Use the ruler etched into the side of the micrometer to determine probe
height.
4.
When you are satisfied with the probe height, tighten the micrometer locking
screw.
5.
Run a Height Sensor Setup procedure (see “Setup” on page 10-4).