
User Manual


20
To place a pattern:
1. Make sure the Workpiece pattern is selected. Follow the steps above for instructions on
selecting a pattern.
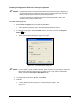
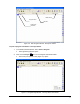
2. Click on the Pattern button on the Program Commands toolbar. See Figure 3-9.
3. Select Place Pattern.
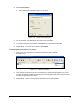
4. A Teach Window opens prompting you to select a pattern and teach the placement point.
5. Follow the screen prompts and click on Done when finished.
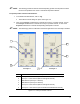
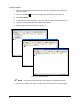
6. Sample program screens are shown in Figure 3-12.
1 USE CONVEYOR 1:
2 DO: C1Line AT (1.543, 3.567)
3 END USE CONVEYOR:
4 USE CONVEYOR 2:
5 DO: C2Dot at (0.382, 5.198)
6 END USE CONVEYOR:
7END:
7
Workpiece
dual_lane.fmw
1 USE CONVEYOR 1:
2 DO: C1Line AT (1.543, 3.567)
3 END USE CONVEYOR:
4 USE CONVEYOR 2:
5 DO: C2Dot at (0.382, 5.198)
6 END USE CONVEYOR:
7END:
7
Workpiece
1 USE CONVEYOR 1:
2 DO: C1Line AT (1.543, 3.567)
3 END USE CONVEYOR:
4 USE CONVEYOR 2:
5 DO: C2Dot at (0.382, 5.198)
6 END USE CONVEYOR:
7END:
7
Workpiece
dual_lane.fmw
1 LINE: 1, START: (0.300, 0.300), End: (4.861, 2.118)
2END:
2
C1Line
dual_lane.fmw
1 LINE: 1, START: (0.300, 0.300), End: (4.861, 2.118)
2END:
2
C1Line
dual_lane.fmw
1 DOT: 1, START: (2.454, 2.110)
2END:
2
C2Dot
dual_lane.fmw
1 DOT: 1, START: (2.454, 2.110)
2END:
2
C2Dot
dual_lane.fmw
Figure 3-12 Placing Patterns
" NOTE Conveyor Block Commands can only be placed in the Workpiece Pattern.
7. Refer to the Fluidmove User Guide or Online Help for instructions on running a program.