
Installation Manual


Power-up and Testing 5-33
6. In the Programming Window, click on the Unload a Board icon .
7. Make sure that the Stop Pins, Clamp Bars, and Lift Tables all function correctly during the
unloading process.
? NOTE If the Stop Pins, Clamp Bars, or Lift Tables do not function correctly, refer to
“Troubleshooting Conveyor” in the Troubleshooting section of this manual.
8. Click on the
Return to Main Window icon .
Leveling the Dispensing System
WARNING! This procedure should only be performed by a trained service technician.
? NOTE If your dispensing system is going to be used as an in-line system, it must be leveled and
aligned in relation to upstream and downstream systems once it has been installed.
Alignment procedures should be developed at your facility.
To level the dispensing system:
1. Perform a Service Shutdown as specified in the Safety section of this manual.
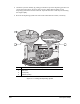
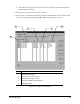
2. Open the Hatch and place a small Box Level in the center of the X-beam as shown in
Figure 5-17.
3. Observe the position of the bubble within the Level’s window. The bubble should be
centered, indicating dispensing system is level from side-to-side.
4. If necessary, adjust the Levelers (feet) of the dispensing system as follows (see Figure 5-18):
a. Loosen the 1 1/2-inch Lock Nut on the Leveler if necessary.
b. Turn the 1 1/2-inch Post Nut in the desired direction until the Level’s bubble is centered,
indicating that the system is level from side-to-side.
> Turning the Post Nut clockwise raises the dispensing system. Turning the Post Nut
counterclockwise lowers the dispensing system.
5. Place a Box Level at the front of the left Y-rail as shown in Figure 5-17.
6. Observe the position of the bubble within the Level’s window. The bubble should be
centered, indicating dispensing system is level from front-to-back.
7. If necessary, adjust the Levelers (feet) of the dispensing system as follows (see Figure 5-18):
a. If necessary, loosen the 1 1/2-inch Lock Nut on the Leveler.
b. Turn the 1 1/2-inch Post Nut in the desired direction until the Level’s bubble is centered,
indicating that the system is level from front-to-back.
> Turning the Post Nut clockwise raises the dispensing system. Turning the Post Nut
counterclockwise lowers the dispensing system.