
Installation Manual


Power-up and Testing 5-21
6. Gently insert tip of a dispensing needle or the tip of a pin into the Y-axis Needle Sensor slot.
> The NEEDLE_SENSE bit should toggle to 0 when the needle/pin passes in front of the
beam and back to
1 when the needle/pin is removed.
7. If your dispensing system is equipped with a Tactile Needle Sensor, locate the bit labeled
TACTILE_SENSE on the PIO 96 Channels 10-13 tab.
8. Lightly press on the Tactile Needle Sensor.
> The TACTILE_SENSE bit should toggle to 0 when the Tactile Needle Sensor is pressed
and return to
1 when pressure is released.
Purge Station
Perform the following procedure to check function of the Purge Station.
? NOTE This procedure assumes that you are already in the FmNT Dispenser I/O Test dialog box.
If not, refer to the first two steps in the Needle Sensor test procedure.
1. On the PIO 96 Channels 6-9 tab, locate the bit labeled
PURGECUP_AIR and toggle the bit
until it reads
1 to turn the purge vacuum ON.
2. Place your finger on the purge boot opening and try to lift the purge cup cover.
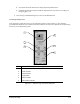
See Figure 5-13.
> If the Purge Station is working properly, it should be difficult to lift the Purge Cup Cover.
3. Toggle the bit until it reads
0 to turn the purge vacuum OFF.
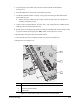
Item Description Item Description
1 Needle Sensor 4 Circular Level
2 Ceramic Tile Substrate 5 Weigh Station (Scale)
3 Tactile Needle Sensor 6 Purge Station
Figure 5-13 Dispensing Calibration Module
3 4
5
61
2