
Installation Manual


Power-up and Testing 5-17
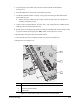
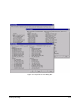
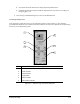
7. Lower the probe and functionally test the Height Sensor as follows (see Figure 5-10):
a. In the FmNT Main Window, click on the
Configuration button and select Setup Height
Sensor
.
b. In the Height Sensor Configuration dialog box, click on
CAN-HS.
c. In the dialog box, verify
Tactile (RT) has been selected in the Type box.
d. Click on
Arm/Disarm until the “Current Arm State” reads ARMED and then click on OK
twice to return to the Main Window.
> The Height sensor probe should be in the down position.
Figure 5-10 Height Sensor Setup Dialog Boxes
e. Open the Hatch and manually lift the Height Sensor Probe.
> The “Current Arm State” should toggle to DISARMED and the green LED on the
Height Sensor should illuminate.
f. Let the probe return to the down position.
> The “Current Arm State” should toggle to ARMED and the green LED on the Height
Sensor should go OFF.
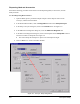
8. In the Main Window, click on the
Jog icon and in the Jog Commands dialog box, click
on
Dispenser. See Figure 5-11.
9. Using the position controls, move the Height Sensor Probe just above the sample production
workpiece that is clamped in the dispense station.