
Installation Manual


Power-up and Testing 5-5
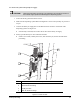
4. Place the torque wrench into the holes on top of the leftmost (Y-axis) Cable Tensioner and
twist the wrench knob counterclockwise for two clicks. See Figure 5-4.
CAUTION! Use only Asymtek torque wrench (P/N 48-8002) for adjusting mechanical cable
tension. Use of any other tool can result in inaccurate dispensing performance or
damage to the positioner cables.
5. Repeat the previous step for the Y-idle and then the X-axis Cable Tensioners.
6. Manually move the Dispensing Head to the back left corner of the dispensing chamber and
then move it to the right along the perimeter of the inside of the machine for two complete
cycles. When the second cycle is complete, move the Dispensing Head to the mid-Y and
mid-X position.
7. Place the torque wrench into the holes on top of the leftmost (Y-axis) Cable Tensioner again
and twist the wrench knob counterclockwise for two clicks.
8. Repeat the previous step for the Y-idle and then the X-axis Cable Tensioners.
9. Manually move the Dispensing Head to the back left corner of the dispensing chamber and
then move it to the right along the perimeter of the inside of the machine for two complete
cycles. When the second cycle is complete, move the Dispensing Head to the mid-Y and
mid-X position.
Item Description
1 Cable Tensioner
2 Torque Wrench (P/N 48-8002)
3 Mechanical Cables
Figure 5-4 Tensioning the Mechanical Cables
32
1