
Installation Manual


Component Installation 4-3
Installing the Light Beacon
The Light Beacon is an integral part of the Safety Interlock System that warns and protects the
equipment operator.
CAUTION! This procedure should only be performed by a trained service technician.
Tools and Materials Needed
The following tools and materials will be needed for this procedure:
• 3-mm hex key • Light Beacon (P/N 194035)
• Flat Head screwdriver • Removable Thread Locker (P/N 40-0019)
To install the Light Beacon:
? NOTE Apply removable thread locker to all threaded fasteners unless otherwise noted.
1. Locate the Light Beacon in the Accessories Crate and remove all packaging material.
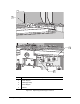
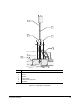
2. At the back of the dispensing system, use your fingers or a flat head screwdriver to loosen the
two captive, slotted thumbscrews attaching the Servo Shelf Cover to the X-Y Servo Motor
Cover. See Figure 4-2.
3. Carefully remove the Servo Shelf Cover by pulling it outward then upward and place it in a
safe location.
CAUTION! Improper removal of the Servo Shelf Cover can damage the locating pins. When
removing the Servo Shelf Cover, avoid contacting the servo-supply capacitors or
the XY servo interface board may be damaged.
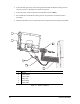
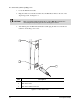
4. Locate the Light Beacon Bracket at the left corner of the Servo Shelf. Remove and retain the
three 3-mm mounting screws. See Figure 4-3.
5. Insert the Power Cable from the Beacon Mast through the large hole in the top of the Bracket.
6. Align the holes in the Beacon Mount with the holes in the Bracket. Attach the Beacon Mount
to the Light Beacon Bracket with the 3-mm screws removed in Step 4. Torque the screws to
25 in-lbs (0.288 kg-m).
7. Locate the Beacon Power Cable connector on the Servo Shelf. One end of the cable will be
loose, but will be labeled. Align and connect the two ends of the Beacon Power Cable.
? NOTE Steps 8 through Step 10 may be performed after the post-installation
testing has been performed.