
Installation Manual


X-1000 Installation Checklist
5 of 13
Step
#
Done
(9)
Test Performed Main Function(s) Tested
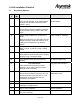
20. Verify that the beacon can be controlled via
the I/O screen and that the red, blue, yellow
and green flash controls work.
Beacon and beacon control
21. Verify that the beacon alarm sounds when
toggled in I/O screen
Beacon alarm functionality
22. Command the machine to find home and
open the hood while the machine is in motion.
Verify that the beacon is yellow and that the
machine stops and is in low power mode.
Interlock, beacon and beacon
control
E. Main Pneumatics
Step
#
Done
(9)
Test Performed Main Function(s) Tested
23. Turn the main-air regulator to 90 psi.
Verify that all other regulators read 90 ±5 psi
when fully opened.
Listen for any leaks on all pneumatics.
Gauge accuracy at full,
pneumatic connections
24. Verify that the Low Pressure Sensor trips
between 50-60 psi while turning the main-air
regulator to 0 psi.
Verify that all other regulators read 0.0 ±3 psi
when fully opened.
Gauge accuracy at zero
25. Check the Low Pressure Sensor by turning
the main air slowly back up and verifying that
the beacon turns green between 50 and 60
psi.
Low Pressure Sensor
26. When completed, dial each regulator up to its
standard setting:
Tooling Air = 70 psi
Fluid Air = 30 psi
Valve Air = 70 psi
27. Check that the Purge Cup holds a vacuum.
Also, ensure other pneumatic operations are
not adversely affected.
Purge Cup and associated
pneumatics
28. Verify that the main air bit properly controls
air to the Tooling and Valve Regulators.
Main Air Solenoid