
Installation Manual


Post-Service Start-up
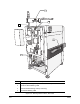
To start up the dispensing system:
1. Remove locks and tags on the Main Power Inlet and Main Air Inlet.
2. Reconnect the facility air hose and AC power cable to the dispensing system.
3. Reset the EMO Switches by turning the red EMO knobs counterclockwise until they pop out.
4. Switch the Main Circuit Breaker to the ON (I) position.
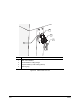
! The Light Beacon should display a solid yellow light.
5. Verify that the dispensing system Hatch is closed.
6. Turn the Computer and Monitor power switches to the ON (I) position.
! The Computer and Monitor power LEDs should be green. The Computer should go into
the boot sequence.
7. At the Computer prompt, press [Ctrl+Alt+Delete], key in the password (if applicable), and
press [Enter].
! The Windows NT desktop should be visible on the Monitor screen.
TIP If the Computer prompts you to select the operating system, click on Start in the lower
left-hand corner of your Monitor screen, select
Programs, and then select the latest
version of
Windows NT Workstation.
8. Press the green
ON (l) button on the Operator’s Console.
! The ON button will illuminate and the Light Beacon should display a green light.
9. On the Windows NT desktop, locate and double click on the FmNT icon
.
10. If a message to run a Valve Offsets routine appears, click on
OK.
! A message should appear that indicates the dispensing system is being initialized.
11. When prompted by FmNT, click on
OK to send the Dispensing Head to the Home position.
! The Dispensing Head should move smoothly to the front left corner of the
dispensing chamber.
! Messages should then appear that indicate that initialization of major subsystems is
taking place.
" NOTES If prompted in Step 11, or if the Dispensing Valve, needle, or Camera has been
moved, a Valve Offsets Routine must be performed prior to starting a production run.
To start a production run or perform programming start up procedures, refer to the
FmNT User Guide or FmNT Online Help.
Safety 2-19