
Installation Manual


10-52 Parts Replacement
Replacing Servo Amplifiers
CAUTION! This procedure should only be performed by a trained service technician.
Tools and Materials Needed
• 3-mm Hex Key • Small A-frame Ladder
• ESD Grounding Strap • Removable Thread Locker (P/N 40-0019)
• Torque Wrench
To remove a Servo Amplifier:
? NOTE All components and fasteners removed during this procedure should be retained in an
orderly manner and in a safe location for reinstallation or shipment back to Asymtek.
1. Perform a Service Shutdown as specified in the Safety section of this manual.
WARNING! The Capacitors on the XY Servo Interface PWA present an extreme shock
hazard. Before removing the Servo Shelf Cover, wait at least one minute after
system shutdown to allow the Capacitors to discharge to safe levels.
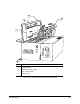
2. Loosen the two captive, slotted thumbscrews holding the Servo Shelf Cover in place.
Carefully remove the Servo Shelf Cover by pulling it outward and upward. See Figure 10-22.
CAUTION! When removing the Servo Shelf Cover, avoid contacting the electrical and
pneumatic components on the Servo Shelf or they may be damaged.
3. Position the ladder at the back of the dispensing system.
4. Locate the Power Indicator LEDs on the XY Servo Interface PWA and verify that they are no
longer illuminated.
> Lighted LEDs indicate that electrical power is still present in the system. Wait until all
LEDs go out before proceeding.
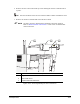
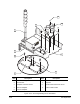
5. Identify which Servo Amplifier needs to be replaced. The X Servo Amplifier is on the left
(closest to the Light Beacon). The Y Servo Amplifier is on the right. See Figure 10-23.
6. After verifying that all of the cables on the Servo Amplifier are clearly labeled, disconnect all
of the cables attached to the Servo Amplifier.
> Label the cables if necessary.
7. Remove the two 3-mm socket head cap screws holding the Servo Amplifier in place.
See Figure 10-23.
> Note the orientation of the Servo Amplifier to make reinstallation easier.