
Installation Manual


Parts Replacement 10-51
To install the XY Servo Interface PWA:
CAUTION! ESD precautions must be taken while handling the XY Servo Interface PWA or
severe damage from electrostatic discharge may occur.
? NOTE Apply removable thread locker to all threaded fasteners unless otherwise noted.
1. Remove the new XY Servo Interface PWA from its ESD protective bag.
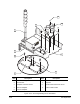
2. Use a 1.0 k-ohm bleeder resistor to discharge each Capacitor. Touch the positive and negative
terminals on each Capacitor for at least 10 seconds.
> Terminals are the slotted screws located on the underside of the board.
3. Verify that the red dots on the bottom of each Capacitor can be seen through the holes on the
underside of the board.
> If you cannot see the red dot on any of the Capacitors, remove the terminal screws, adjust
the position of the Capacitor until the red dot can be seen, and then reinstall the screws.
Torque the screws to 20 in-lbs (0.230 kg-m).
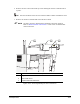
4. Position the new XY Servo Interface PWA on the Servo Shelf such that the mounting holes
in the board match those on the Servo Shelf.
5. Apply a small amount of removable thread locker to each of the hold-down screws.
6. Reinstall the nine 3-mm hold-down screws removed from the old XY Servo Interface PWA.
Torque the screws to 20 in-lbs (0.230 kg-m).
CAUTION! Do not overtighten the screws or the Board may be damaged.
7. Reconnect all of the cables to the appropriate connectors on the XY Servo Interface PWA.
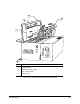
8. Replace the Servo Shelf Cover and secure it in place by tightening the two captive,
slotted thumbscrews. Do not use removable thread locker.
CAUTION! When installing the Servo Shelf Cover, avoid contacting the electrical and
pneumatic components on the Servo Shelf or they may be damaged.
9. Remove the ladder.
10. Perform a Post-Service Start-up as specified in the Safety section of this manual