
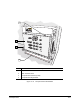
Installation Manual


10-46 Parts Replacement
To install the Main Interface PWA:
CAUTION! ESD precautions must be taken while handling the Main Interface PWA or severe
damage from electrostatic discharge may occur.
? NOTE Apply removable thread locker to all threaded fasteners unless otherwise noted.
1. Remove the new Main Interface PWA from its ESD protective bag.
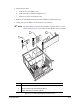
2. Align the screw holes of the new Main Interface PWA to the screw posts on the cover.
3. Secure the new PWA to the inside of the cover with the three Phillips head hold-down screws
removed from the old PWA. Torque to 20 in-lbs (0.230 kg-m). See Figure 10-21.
CAUTION! Do not overtighten the screws or the Board may be damaged.
4. Reattach all of the cables to the appropriate connections on the PWA.
5. Close the cover and tighten the two captive, slotted thumbscrews to secure the panel in place.
> Do not use removable thread locker.
6. Reinstall the 3/16-inch (5-mm) hex posts on all of the connectors. Torque to
8 in-lbs (0.09 kg-m). See Figure 10-20.
7. Reinstall the Computer inside the Lower Front Cabinet by performing the steps specified in
“Computer Removal and Installation” earlier in this section.
8. Perform a Post-Service Start-up as specified in the Safety section of this manual.