
Installation Manual


10-44 Parts Replacement
Replacing the Main Interface PWA
Use the following procedure to remove and replace the Main Interface PWA if fault isolation procedures
in the Troubleshooting section of this manual have confirmed that it has failed.
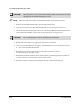
CAUTION! ESD precautions must be taken while working on the Main Interface PWA or
severe damage from electrostatic discharge may occur.
Tools and Materials Needed
• Phillips Screwdriver • 3/16-inch (5-mm) Nut Driver
• ESD Grounding Strap • Torque Wrench
To remove the Main Interface PWA:
? NOTE All components and fasteners removed during this procedure should be retained in an
orderly manner and in a safe location for reinstallation or shipment back to Asymtek.
1. Perform a Service Shutdown as specified in the Safety section of this manual.
2. Remove the Computer from inside of the Lower Front Cabinet as specified in the “Computer
Removal and Installation” procedure earlier in this section.
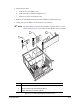
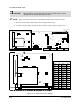
3. Lay the Computer down on its right side. Remove the 3/16-inch (5-mm) hex posts from all of
the D-sub connectors on the Main Interface Panel. See Figure 10-20.
4. Unscrew the two captive, slotted thumbscrews on the left side of the Computer (see
Figure 10-17) and open the Main Interface Panel.
5. Take note of where each cable is connected to the Main Interface PWA. Label the cables and
connections if necessary. See Figure 10-21.
6. Disconnect all of the cables attached to the Main Interface PWA.
7. Remove the three Phillips head screws attaching the Main Interface PWA to the inside of the
Computer Cover.
8. Remove the Main Interface PWA.
? NOTE The faulty Main Interface PWA should be returned to Asymtek. Refer to “Return
Material Authorization” in this section for merchandise return instructions.