
Installation Manual


Parts Replacement 10-41
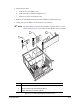
3. Align the new PMAC Card with the connections in Slot Number See Figure 10-18.
4. Gently press down on the card until it is completely seated in the slot.
> The shoulder on the bottom surface of the card will be flush with the top edge of the slot.
5. Connect the ribbon cables in the following order:
a. To the rear of the PMAC Card.
b. To J2 and J4 on the PMAC daughter card.
c. To J2, J5, and J7 on the PMAC Card.
6. Install the small Phillips head screw attaching the PMAC Card Hold-down Clip to the
Computer Case (see Figure 10-18). Torque the screw to 20 in-lbs (0.230 kg-m).
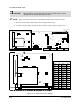
7. Place the Hold Down Bar across the top of the cards and tighten the slotted thumbscrew.
> Do not use removable thread locker.
8. Close the Computer Door and tighten the two captive, slotted thumbscrews.
> Do not use removable thread locker.
9. Reinstall the Computer inside the Lower Front Cabinet by performing the steps specified in
“Computer Removal and Installation” earlier in this section.
10. Perform a Post-Service Start-up as specified in the Safety section of this manual.