
Installation Manual


10-40 Parts Replacement
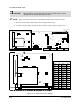
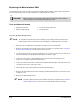
To install the PMAC Card:
CAUTION! ESD precautions must be taken while handling the PMAC Card or severe
damage from electrostatic discharge may occur.
? NOTE Apply removable thread locker to all threaded fasteners unless otherwise noted.
1. Remove the new Main Interface PWA from its ESD protective bag.
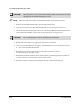
2. Visually verify the jumper settings for the new PMAC Card as shown in Figure 10-19.
Jumper Settings
E1-2 1-2 E34 ON
E5-6 ON E40-43 ON
E7 1-2 E45-46 ON
E8-17 ON E49-50 ON
E18 1-2 E67-70 ON
E19 1-2 E80 ON
E20-21 1-2 E85 OFF
E24 1-2 E87 OFF
E25 1-2 E88 OFF
E26 1-2 E89 ON
E27 1-2 E90 1-2
E28 2-3 E91-92 ON
E31 ON E98 1-2
Figure 10-19 PMAC Card Jumper Settings
E89
E5
E6
E80
E17
E21
(1-2)
E20
(1-2)
E80
E45
E46
E21
(1-2)
E21
(1-2)
E34
E31
E28
(2-3)
E7
(1-2)
E2
(1-2)
E1
(1-2)
E8-16
E67-70
E40-43
(1-2)
P4
P3
J8
J7 J6
JS2
J5
JS1
J4 J3 J2
J1
J8
J7
E87
E88
E85
E90
E18 E19
E25 E24
E27 E26